Big Messy Ideas

Monday, January 31, 2011

Recognizing Letters


Grant can tell you the names of almost every superhero and the real identities of some of them, too. But I haven't worked with him much on recognizing the letters of the alphabet. When Nate, who is five months younger than Grant, came over and pointed to a fridge magent and said, "Q," I decided it was time to learn.

This week, I started with the letters of the kids' first names. At the library I found this great series of "sound box" books from The Child's World Press. We checked out My "g" Sound Box, My "n" Sound Box, and My "a" Sound Box. In the "g" book, a kid named Little "g" fills a box with items that start with the letter "g." Each book is a little different, and some of them are kind of clever and funny. I read the books to the kids during lunch when I had a captive audience trapped in high chairs. It worked well.

Today, we made artwork to hang up as a reminder of the words that start with the same letters as their first names. Here's what we did.
Supplies:
Large cardstock
Scissors
Glue
Pictures of items that start with the letter
Fun items that start with the letter (noodles, glitter, feathers, etc)

I cut out a large "G," "N," and "A" from colored scrapbook paper. I chose green for Grant, aqua for Avery and for Nate, I couldn't think of a color that started with N, so he got blue.

I googled "letter g pictures," and found a free preschool worksheet to print out. I cut out the pictures. I also put out some dry pasta of various shapes (G - grains, N - noodles, A- angel hair pasta).

I put some school glue in repurposed applesauce containers and gave the boys small foam brushes.  They brushed he glue onto their letters and glued on the pictures and the pasta.

Avery took this craft to another level. She got the idea to turn her giant letter A into an angel. She made the angle hair pasta into strands of hair, drew a face, and cut out paper wings. She even added a wand for fun. (As a side note, this made me extremely happy. As a crafty mom, this was the moment I had been waiting for since Avery was born. I love to see that originality and creativity coming out! Woo hoo!)

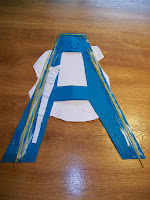
A good time was had by all. Now we can look at them on the wall and review letter sounds. Yeah!

Friday, January 28, 2011

Snow Painting


This empty bottle of hand soap was
the best because it was huge and the water
came out easily without squeezing.
Supplies:
Empty plastic bottles (ketchup, mustard, hand soap refills, etc.)
Water
Food color

I am a person who loves change. I often envy people whose companies relocate them every couple years. That would suit me just fine. But since we are firmly planted here in Northern Illinois, I rely on the change of seasons to keep things interesting. When the first snow falls here in Chicagoland (sometimes as early as October), you will find me outside reveling in it as soon as possible. And now that I have two little ones who feel the same thrill, I don't have to go out alone.

But the end of January has come, and the snow has been on the ground for a couple months now.  I've noticed that the specialness of winter is wearing off for me and the kids, too.  Avery and Grant still like to play outside, but only for a couple minutes. Grant gets about as far as our swingset before saying, "I want to go inside for hot chocolate now."

Grant and Avery on the swings.
But I firmly believe that the crisp winter air is good for us. And I don't want to spend 15 minutes bundling them up only to come right back inside 10 minutes later.  So I had to brainstorm some tricks for keeping the kids entertained in the snow for at least 20 minutes.

I read this simple idea for painting snow long ago and decided it was time to try it. I pulled out three empty ketchup bottles and one big empty hand soap bottle that I have been saving for such an occasion. I filled these with tap water and tinted each with food coloring. (I skipped yellow because that whole yellow snow thing is pretty gross.) And out we went to paint the snow.  The kids had a great time, but the "paint" ran out too quickly. If I would have been more prepared, they might have painted the snow for hours.
Avery, snow artist
Nate mixing paints
Grant painting lines in the snow

Tuesday, January 18, 2011

Pop Bottle Penguins (Pre-schoolers and older, please!)


I wasn't sure whether to post this craft or skip it. From a mom's perspective, making these things was miserable. Nate was peeling off the eyes and cotton balls as fast as I could stick them on. Grant wanted to put the eyes on the back of the bottle and the feet on the head.  I did not have enough hands to supervise the two 2-year-olds. Avery, my 5-year-old, did a great job, though. Thankfully, she was able to work very independently. She loved making her penguin, and the boys loved their finished products. They did turn out so cute, so I  decided to post. Just take my advice, this craft is not for toddlers. For your sanity, save the idea until your kids are in pre-school or older. 


Supplies for one penguin:
1 empty 2 liter pop bottle or smaller water bottle
1 black sock (child or adult)
Cotton balls
Craft glue
Glue dots (optional)
1 baby or toddler sock for the hat
1 pair of goggly eyes
Orange construction paper of foam sheet

Step 1: Stretch the large black sock over the bottle from the cap down.  If you want to, use hot glue to secure the sock to the bottom of the bottle.

Step 2: Pour craft glue onto a plate.  Have your child dip cotton balls in the glue and stick them to the penguin's belly area.

Step 3: Place a glue dot on each goggly eye.  Let your child stick them to the face area above the belly and below the bottle cap.

Step 4: Cut out a diamond-shaped beak and a hot-air balloon shape for the feet from the orange paper or foam.  Place a couple glue dots on each of these.  Let your child stick them in the correct places.

Step 5: Tie a knot in the toe-end of the baby sock. Have your child put the baby sock over the black sock on the pop bottle cap for a hat.

Step 6: Display out of reach because the finished penguin is kind of mess-up-able.