Big Messy Ideas

Wednesday, December 8, 2010

A Christmas Craft for Toddlers

Reindeer Handprint and Footprint Craft
'Tis the season for making cutesy crafts for relatives near and far.  Over the years, I have made many different Christmas projects with Avery and Grant. Those experiences, plus Avery's very wise preschool teachers, have taught me a few things about crafting with the very young.

Most importantly, I like kids' crafts to be about the experience.  This, as I learned from Avery's teachers, is called "process art."  It is art that focuses on the creative process rather than the end product.  I don't want to hand them an outline of a Christmas tree and some green paint.  There is no creativity or learning in that type of project.  I look for craft ideas that leave room for personality and freedom of expression.  I find that those are the projects that I, as a mom, tend to hang onto because they have value and meaning.  They tell me something about my child at that moment in time.  I throw out the coloring pages and assembly crafts that have no personality.  I keep the odd-looking scribbles that Avery explains in detail are her and Grant at the beach (and I write on the back what she told me).  And call me cheesy, but I am a sucker for hand print crafts.  Nothing can bring me to tears like the size and shape of those precious little paws.


However, I have noticed that my kids like to make things that looks like something.  They tend to get frustrated and bored by their own paint smears and scribbles after a while.  They want to paint a Christmas tree or Santa Claus, but they lack the ability.  So, I try to find or invent projects that strike a balance between a creative process and a pleasing outcome.

Also, because I craft with three kids around the age of 2, I try to find crafts that toddlers can do independently or with minimal help.  This is the hardest part.  At the very least, I want them to tell me where to put the eyes or the ornaments or the truck tires as I glue them on.  That reflects what they understand about the world, anyway. 

I had all this in mind today when I found the Reindeer Handprint and Footprint craft online. I did this with my three two-year-olds this morning.  It took about 20 minutes from start to finish, including singing Rudolph the Red-Nosed Reindeer together twice.  We all had fun, and the final products are cute and full of personality and keepsake value.


Nate's reindeer
Grant's reindeer


Layla's reindeer


Step 1: Gather your supplies.  You will need brown and green construction paper; small amounts of white, black, and red paint; glue; scissors; and a pencil for tracing around hands and feet.  If you are smart, you will do this before you mention the words "art project" to your kids.  Mine were impatiently waiting while I scurried around and got the stuff ready.

Step 2: On brown paper, trace around both hands and one foot (don't detail the toes) of each child.  Cut these out.
I labeled the back of each print with the child's initial so I wouldn't mix them up if things got crazy.


Step 3: Give your child the piece of green construction paper and some white paint.  Ask him or her to finger paint a "snowstorm" on the paper.  If you child loves to finger paint, give them several pieces and let them go crazy with it.  If you have a child who doesn't like messy fingers, give them a paintbrush, a circle stamp, or even a used wine bottle cork to paint the snowstorm.  Choose your favorite for the reindeer's background.
Grant likes to finger paint.

Layla HATES messy hands. I should have given her a paintbrush!


Step 4: Glue the footprint and handprints on the page.  If you're feeling bold, allow your child to do this independently. For this craft, I helped because I wanted to create a keepsake that would be recognizable.

Step 5: Dip your child's index finger or thumb in black paint.  Help them place the two eyes.

Step 6:  Dip your child's index finger or thumb in red paint.  Help them place the nose.

Step 7:  Hang this cute little critter where your child can enjoy his or her own artwork all season long.  Make more than one and give them as gifts.  Merry Christmas!

Friday, December 3, 2010

Frozen Fun

Winter is here! We had our first snowfall this week and daytime temperatures below freezing. But my little ones refuse to hibernate.  So we suit up in coats, hats, boots, and mittens, and head outdoors for short periods of time. 

Earlier this week, I noticed that Grant was fascinated by the ice that had frozen in the buckets and toys. So, I took my cue from him and decided to set up a toddler science experiment. I brought out plastic cups of cold water.  I let the kids add food coloring.  Then, I brought out a container of little junk that I found in the craft drawers and toy box - plastic and wooden beads, yarn, plastic screws, a Matchbox car, an Ironman figure, plastic polar animals, and an Oscar the Grouch figure. The kids picked out items and put them in the water.  Then, we left the cups outside to freeze while we went for naps.


(Lest you get the mistaken idea that everyone was on their best behavior during this little activity, you should know that the cups of water got spilled twice, and Nate dumped about 300 tiny beads into our frozen grass, which we then had to pick up one by one without gloves.  Yelling was involved.)

Today, I prepped the kitchen for some icy water play. Water play is probably the favorite activity in our house. I love to do it because my kids love to do it so much. They will play cooperatively and quietly for about an hour. It's like magic, I tell you.

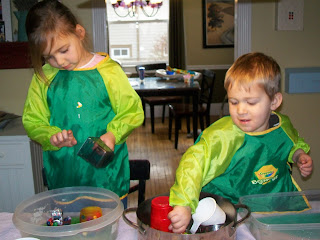
Water play can be a little messy, but it's not as bad as you might think. First of all, it's only water. Now, repeat that with me, "It's only water." Really, it can't do much damage. It doesn't stain. It isn't sticky. There are no crumbs.  As long as you clean it up quickly, water spills are not a big deal.  Over the years, I have come up with some tricks for making water play a little less messy.  I cover my kitchen island with old bath towels and keep extras on hand for quick clean ups. I also put old towels on the floor under the kids' chairs. The kids wear smocks, but they usually have to change clothes afterward anyway. Sometimes, I have put baking sheets under the bowls to catch extra spills. Then, I set out large Tupperware containers, measuring cups, scoops, ladles, spoons, and a variety of containers. That's how I set up the kitchen for our ice experiment.
Notice the many large towels on hand.
I brought the cups of colorful, frozen water inside to the kids, who were filled with anticipation.  They immediately observed (see, it is science!) that the ice was stuck in the cups.  We talked about how the ice was stuck because it was too big.  Then, we talked about how to shrink ice.  Avery came up with warm water (problem solving!).  Grant understood this because the ice we put in his hot soup always shrinks and melts in the warm liquid.

I filled a large pot with warm water and let them go to work.  Avery liked scooping and pouring the warm water over the ice block.  Grant went the more direct route of submerging the ice block in the pot of warm water.  As the ice melted, they were excited to extract the treasures from it.


It was so much fun to watch their little minds at work.  They were planning, and thinking, and testing, and discovering.  We talked about how we started with water, changed it o ice by making it cold, and turned it back into water by adding heat (In Science lingo, that's a states of matter lesson).  Both Avery (almost 5) and Grant (2) were fully engaged in the activity for a solid hour.  Like I said, water play is magic.


When Avery's ice was gone, she suggested that we do an activity she learned at preschool.  It's a science activity called "Sink and Float."  She told me how to set up the area and label the signs (I did not do this like Mrs. Brindel does, but she was okay with that.)  She showed me how to test the different items to see which ones sink and which ones float.  We used this opportunity to explain to Grant what sink and float meant.  He was only a little interested and went right back to pouring water on Ironman.  But Avery finished the experiment and counted to see which category had more items. I'm glad she showed me this game.  I will definitely try this with the boys sometime.

We ended the activity by setting more cups of cold, colored water on the back stoop.  The kids were so sad to stop playing, but this way they know we will play with ice again soon. 

Happy winter!