Big Messy Ideas

Wednesday, December 8, 2010

A Christmas Craft for Toddlers

Reindeer Handprint and Footprint Craft
'Tis the season for making cutesy crafts for relatives near and far.  Over the years, I have made many different Christmas projects with Avery and Grant. Those experiences, plus Avery's very wise preschool teachers, have taught me a few things about crafting with the very young.

Most importantly, I like kids' crafts to be about the experience.  This, as I learned from Avery's teachers, is called "process art."  It is art that focuses on the creative process rather than the end product.  I don't want to hand them an outline of a Christmas tree and some green paint.  There is no creativity or learning in that type of project.  I look for craft ideas that leave room for personality and freedom of expression.  I find that those are the projects that I, as a mom, tend to hang onto because they have value and meaning.  They tell me something about my child at that moment in time.  I throw out the coloring pages and assembly crafts that have no personality.  I keep the odd-looking scribbles that Avery explains in detail are her and Grant at the beach (and I write on the back what she told me).  And call me cheesy, but I am a sucker for hand print crafts.  Nothing can bring me to tears like the size and shape of those precious little paws.


However, I have noticed that my kids like to make things that looks like something.  They tend to get frustrated and bored by their own paint smears and scribbles after a while.  They want to paint a Christmas tree or Santa Claus, but they lack the ability.  So, I try to find or invent projects that strike a balance between a creative process and a pleasing outcome.

Also, because I craft with three kids around the age of 2, I try to find crafts that toddlers can do independently or with minimal help.  This is the hardest part.  At the very least, I want them to tell me where to put the eyes or the ornaments or the truck tires as I glue them on.  That reflects what they understand about the world, anyway. 

I had all this in mind today when I found the Reindeer Handprint and Footprint craft online. I did this with my three two-year-olds this morning.  It took about 20 minutes from start to finish, including singing Rudolph the Red-Nosed Reindeer together twice.  We all had fun, and the final products are cute and full of personality and keepsake value.


Nate's reindeer
Grant's reindeer


Layla's reindeer


Step 1: Gather your supplies.  You will need brown and green construction paper; small amounts of white, black, and red paint; glue; scissors; and a pencil for tracing around hands and feet.  If you are smart, you will do this before you mention the words "art project" to your kids.  Mine were impatiently waiting while I scurried around and got the stuff ready.

Step 2: On brown paper, trace around both hands and one foot (don't detail the toes) of each child.  Cut these out.
I labeled the back of each print with the child's initial so I wouldn't mix them up if things got crazy.


Step 3: Give your child the piece of green construction paper and some white paint.  Ask him or her to finger paint a "snowstorm" on the paper.  If you child loves to finger paint, give them several pieces and let them go crazy with it.  If you have a child who doesn't like messy fingers, give them a paintbrush, a circle stamp, or even a used wine bottle cork to paint the snowstorm.  Choose your favorite for the reindeer's background.
Grant likes to finger paint.

Layla HATES messy hands. I should have given her a paintbrush!


Step 4: Glue the footprint and handprints on the page.  If you're feeling bold, allow your child to do this independently. For this craft, I helped because I wanted to create a keepsake that would be recognizable.

Step 5: Dip your child's index finger or thumb in black paint.  Help them place the two eyes.

Step 6:  Dip your child's index finger or thumb in red paint.  Help them place the nose.

Step 7:  Hang this cute little critter where your child can enjoy his or her own artwork all season long.  Make more than one and give them as gifts.  Merry Christmas!

Friday, December 3, 2010

Frozen Fun

Winter is here! We had our first snowfall this week and daytime temperatures below freezing. But my little ones refuse to hibernate.  So we suit up in coats, hats, boots, and mittens, and head outdoors for short periods of time. 

Earlier this week, I noticed that Grant was fascinated by the ice that had frozen in the buckets and toys. So, I took my cue from him and decided to set up a toddler science experiment. I brought out plastic cups of cold water.  I let the kids add food coloring.  Then, I brought out a container of little junk that I found in the craft drawers and toy box - plastic and wooden beads, yarn, plastic screws, a Matchbox car, an Ironman figure, plastic polar animals, and an Oscar the Grouch figure. The kids picked out items and put them in the water.  Then, we left the cups outside to freeze while we went for naps.


(Lest you get the mistaken idea that everyone was on their best behavior during this little activity, you should know that the cups of water got spilled twice, and Nate dumped about 300 tiny beads into our frozen grass, which we then had to pick up one by one without gloves.  Yelling was involved.)

Today, I prepped the kitchen for some icy water play. Water play is probably the favorite activity in our house. I love to do it because my kids love to do it so much. They will play cooperatively and quietly for about an hour. It's like magic, I tell you.

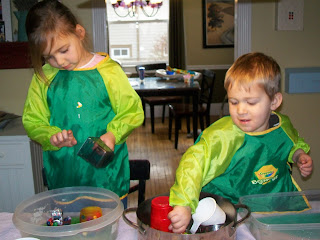
Water play can be a little messy, but it's not as bad as you might think. First of all, it's only water. Now, repeat that with me, "It's only water." Really, it can't do much damage. It doesn't stain. It isn't sticky. There are no crumbs.  As long as you clean it up quickly, water spills are not a big deal.  Over the years, I have come up with some tricks for making water play a little less messy.  I cover my kitchen island with old bath towels and keep extras on hand for quick clean ups. I also put old towels on the floor under the kids' chairs. The kids wear smocks, but they usually have to change clothes afterward anyway. Sometimes, I have put baking sheets under the bowls to catch extra spills. Then, I set out large Tupperware containers, measuring cups, scoops, ladles, spoons, and a variety of containers. That's how I set up the kitchen for our ice experiment.
Notice the many large towels on hand.
I brought the cups of colorful, frozen water inside to the kids, who were filled with anticipation.  They immediately observed (see, it is science!) that the ice was stuck in the cups.  We talked about how the ice was stuck because it was too big.  Then, we talked about how to shrink ice.  Avery came up with warm water (problem solving!).  Grant understood this because the ice we put in his hot soup always shrinks and melts in the warm liquid.

I filled a large pot with warm water and let them go to work.  Avery liked scooping and pouring the warm water over the ice block.  Grant went the more direct route of submerging the ice block in the pot of warm water.  As the ice melted, they were excited to extract the treasures from it.


It was so much fun to watch their little minds at work.  They were planning, and thinking, and testing, and discovering.  We talked about how we started with water, changed it o ice by making it cold, and turned it back into water by adding heat (In Science lingo, that's a states of matter lesson).  Both Avery (almost 5) and Grant (2) were fully engaged in the activity for a solid hour.  Like I said, water play is magic.


When Avery's ice was gone, she suggested that we do an activity she learned at preschool.  It's a science activity called "Sink and Float."  She told me how to set up the area and label the signs (I did not do this like Mrs. Brindel does, but she was okay with that.)  She showed me how to test the different items to see which ones sink and which ones float.  We used this opportunity to explain to Grant what sink and float meant.  He was only a little interested and went right back to pouring water on Ironman.  But Avery finished the experiment and counted to see which category had more items. I'm glad she showed me this game.  I will definitely try this with the boys sometime.

We ended the activity by setting more cups of cold, colored water on the back stoop.  The kids were so sad to stop playing, but this way they know we will play with ice again soon. 

Happy winter!


Wednesday, November 24, 2010

Make Your Own Children's Museum

My kids love to visit children's museums. Our family favorites are Kohl's Children's Museum in suburban Chicago and the Discovery Center in Rockford. But those fun places are about an hour away from our house. When we have a chance to go to a museum, the kids spend most of their time in the imaginative play centers.  These are the areas set up to look like baby nurseries, kitchens, pizza parlors, grocery stores, and construction sites.  And really, there's not a lot to these sets ups.  They use kid-sized elements to replicate grown-up life.  With a little creativity, it's pretty easy to set up an imaginative play center at home.

Avery's favorite imaginative play at home is the baby hospital or pediatrician's office. We gather her baby dolls, baby blankets, baby bottles, bowls, spoons, wash cloths, Ace bandages, Q-tips, cotton balls, ice packs, heating pads, and a pretend doctor's kit. We lay out the blankets as hospital beds and put a baby on each bed. We also add clipboards and a phone for extra realism. We bathe the baby's and dress fake wounds. We take temperatures, blood pressures, check heartbeats, give shots and medicine. It's a lot of fun for a wintery morning.

We have done the same thing with a veterinarian's office, a grocery store, and a restaurant. It is especially fun to set this up after your kids go to bed and surprise them with it in the morning. It starts the day off in a fun way and gets their imaginations working early. I don't play with them the whole time, but I get them started and jump in from time to time to add new ideas. I might answer the phone and tell the "doctors" about new cases arriving. I might start cleaning a baby's cut and let the kids take over. I might examine a baby and notice a new injury or a fever. This helps kids come up with story ideas that they can use later on their own.

The pictures below show our most recenct baby hospital.  The kids in the photo are Avery, Grant, and our neighbor, Layla.  They all had a blast imagining and playing all morning.


Thursday, November 18, 2010

Love is the Answer

Today I have John Lennon in my head. I keep hearing his words, "Love is the answer."  I'm sure he didn't have three unruly children in mind when he wrote that, but that's how I'm applying it.

For the past three weeks, I've had a hard time managing my kid chaos.  Avery, Grant, and Nate have been constantly fighting, arguing, crying, screaming, hitting, spitting, kicking, biting, and creating massive chaos at home, at the library, in the grocery store, in the car, at the park, and wherever else we have gone. I've been spinning in circles to comfort hurt feelings and break up brawls and quiet cruel words.

It's been a big bag o' frustration, and I'll admit, it was wearing on me. Big time. As one terrible day turned into an awful week and then two and then three, I started to dread getting out of bed in the morning. I tried to take control of the situation (see my Keep Your Hands to Yourself! post from last week), but nothing worked.

Finally, this morning, it came to me. A big, heaping dose of love was what this mess needed. And I was the one who was going to have to give it. From deep inside my tired, frustrated, at-wit's-end self, I was going to have to dredge up some sugar.

Kids react so much better to enthusiasm and praise than to scolding and punishing. I know this. I have seen it work. I try to parent that way. But let's face it, when the patience is all used up, it's hard to be positive and cheerful. I wanted to get in my minivan and drive straight out of town, not start a tickle fight or sing a happy song. Still, I knew happy, happy, joy, joy was the way to go. But how? How could I find it within me to give that love?  

The answer was simple. I needed divine intervention. The kind of love that was needed in this house was not going to come from me. It couldn't possibly. It had to come from God. So I sat down this morning and had desperate chat with Him. I asked him to fill me with his love, joy, peace, patience, kindness, gentleness, and self-control. I asked him to help me see these kids through His eyes and hear them through His ears.

God answered my prayer. Right then and there.

When Nate came in cranky and clingy at 6:30 a.m., I saw a boy who missed his dad and wanted his mommy. I knew that he deserved the best comfort and care that I could give. Even though I was tired, I somehow sang Itsy Bitsy Spider with him in my silliest voice and made him laugh. Avery asked me to practice drawing Arthur with her, and in the midst of the morning's busiest time, I sat down and gave her my full attention. When Grant woke up, I saw that he wanted some of this special attention, too. I hugged him and called him my special boy and told him how much I loved him. I held his hand as we went into the kitchen for a sippy cup of milk.

These small gestures made all the difference. The tears and tantrums were replaced, at least for the morning, by happy faces and cheerful kids. Avery, Grant, and Nate were basking in the love that I was handing out like candy on Halloween. This love fest took energy and patience that I could not muster on my own. It took God stepping in and doing through me what I could not do without Him. I am amazed and thankful for His divine intervention. 

And I bet the kids are, too.

Friday, November 12, 2010

Keep Your Hands to Yourself!

Grant and Nate are having a hard time keeping their hands to themselves these days. Brawls break out over toys every few minutes. Grant grabs for the firetruck in Nate's hand. Nate clutches it to his stomach and spins away. Grant thumps Nate on the head and grabs for it again. Nate defends himself with a big shove. Grant falls backward but quickly picks himself up and runs at Nate like an angry rhino. He swipes Nate's cheek and draws blood.  Nate flops down on top of Grant and starts rolling. The firetruck is forgotten, but the hard feelings hang around.

That's why I was so exicted to run across the book Hands are Not for Hitting by Martine Agassi at the library. I read it to the kids almost every day during lunch this week. Then, I traced their hands and cut them out. I glued the wrists to a piece of construction paper so that the hands could still move. I wrote the rule "hands are not for hitting" at the top of the page. At the bottom, Avery helped me make a list of other things we can do with our hands, like clapping, waving, building, coloring, washing, etc. Some of these are from the book. After the project was finished, I hung it on the wall next to the table so we can talk about it every day.

Next week, I plan to have the kids make handprints on paper. I will then give them pictures cut out of magazines and catalogs and have them find things they would like to hold in their hands. I'll help them use glue sticks to glue the pictures onto the hands. This will be another reminder that hands are for many things, but not for hitting.

I'm not expecting this to stop every fight at our house, but I am hoping it will be another reminder for the boys to keep their hands to themselves!

Rock Hounds

My kiddos love to play with rocks. Grant can't walk past a rock without picking it up. Avery has a can of rocks, which she calls "treasures," in her room. Now Nate, the boy I babysit, has also fallen in love with rocks.

I discovered this during a desperate week. "Falling back" to standard time has been disastrous at our house. The kids are now waking up at 5:30 a.m. and running out of steam long before 9 a.m. The boys push, shove, and tackle each other all morning while Avery screams at them every time their wrestling gets close to her stuff. If I leave the living room to make toast or pour cups of milk, I am interrupted by loud thuds and bloodcurdling screams. It's been rough.

In a desperate attempt to try something new to break our bad cycle, I set out a tupperware container of river rocks yesterday morning. All three kids were captivated by the smooth stones. They sorted, piled, poured, and played quietly together for at least 10 minutes. It was so peaceful that I kept peeking into the living room to make sure they were all still breathing. And they were! They were also smiling, laughing, and working together.

So, today I headed out to Hobby Lobby to buy more of these magic rocks. My mom thought I was crazy to pay money for rocks, but I explained that these magic rocks are smooth and polished, which makes them better than ordinary backyard rocks. They are also clean. Plus, they were only $2.99 for a three-pound bag. I bought two bags and used 40%-off coupons to get an even better deal. In the Christmas section, I found miniature baking tongs for $1.99. I bought two pairs of these for picking up the rocks. This will help develop find motor skills, too.

Back at home, I poured the rocks into a plastic shoebox-sized container. I set out the tongs, an old muffin tin, plastic measuring cups, and a few tupperware containers. The boys were captivated for about 15 minutes, which is amazing for two-year-olds.  Then., naturally, they started throwing the rocks across the room and it was time to put the activity away. Rock-throwing aside, I think this will be great indoor fun this winter.